[NCP] CLOVA Studio API를 이용한 챗봇 서비스 구현
CLOVA Studio로 나만의 챗봇을 만들어 보자

이전에 CLOVA Speech & CLOVA Studio API를 통한 음성파일을 텍스트로 변환 하여 요약 해 주는 서비스를 구현 해 보았는데요.
[NCP] Clova Speech & Clova Studio API 활용 해보기
이번 주제에서는 NCP(Naver Cloud Platform)의 CLOVA Studio API 만을 이용하여 챗봇 서비스를 구현 해 보려고 합니다 !
들어감에 앞서, NCP(Naver Cloud Platform)에서는 챗봇 전용 서비스인 CLOVA Chatbot 서비스를 제공 하고 있습니다.
CLOVA Chatbot 서비스 참고 자료
NAVER CLOUD PLATFORM
네이버 CLOVA Chatbot API. 사용자의 질문 의도를 이해하는 Chatbot 구축. 강력한 대화 모델 엔진 및 쉬운 Chatbot빌더 적용. 다양한 메시징 채널 연계 가능. www.ncloud.com
저는 CLOVA Chatbot 서비스가 아닌 일반 LLM 모델인 Clova Studio 만을 이용하여 챗봇 서비스를 만들어 보았습니다.
💡 사용한 Tools
- Develop Tools : VSCode
- Language : Python 3.11.7
- Framework : Flask 3.0.2, Streamlit 1.37.1
- Open API : Clova Studio (LLM) -Prompt 작업 및 튜닝 X
Streamlit 이란?
- Streamlit 은 Python을 사용하여 데이터 애플리케이션을 빠르고 쉽게 만들 수 있는 오픈 소스 프레임워크입니다. 주로 데이터 과학자와 머신러닝 엔지니어들이 인터랙티브 대시보드, 데이터 시각화, 모델 결과를 공유하는 데 사용됩니다.
1. Streamlit의 특징
- 쉽고 빠른 개발 : 몇 줄의 Python 코드만으로도 복잡한 데이터 애플리케이션을 만들 수 있습니다.
- 리액티브 업데이트 : 코드 변경 시 실시간으로 대시보드가 업데이트되어, 빠른 반복 개발이 가능합니다.
- 인터랙티브 위젯 : 다양한 위젯(슬라이더, 버튼, 텍스트 입력 등)을 제공하여 사용자와 상호작용할 수 있습니다.
- 간편한 배포 : 애플리케이션을 쉽게 배포하고 공유할 수 있습니다.
2. 주요 기능
- 데이터 시각화 통합 : Matplotlib, Plotly, Altair 등과 같은 라이브러리와 쉽게 통합하여 데이터를 시각화할 수 있습니다.
- 사용자 입력 처리 : 사용자 입력을 받아 데이터 필터링, 모델 재훈련 등의 작업을 수행할 수 있습니다.
- 캐싱 : 데이터 로딩, 모델 예측 등의 시간이 오래 걸리는 작업을 캐싱하여 성능을 최적화할 수 있습니다.
Streamlit 참고 자료
GitHub - streamlit/streamlit: Streamlit - A faster way to build and share data apps.
Streamlit - A faster way to build and share data apps. - streamlit/streamlit github.com
Streamlit * A faster way to build and share data apps
Streamlit is an open-source Python framework for data scientists and AI/ML engineers to deliver interactive data apps … streamlit.io
작업 과정
1. (CLOVA Studio) 플레이그라운드 테스트 앱 생성
2. 테스트 앱 소스코드 예제 및 키 값 확인
3. 프로젝트 디렉토리 생성 & 코드 작성
4. 가상 환경 활성화 (venv) & 코드 실행
5. 서비스 동작 확인
1. (CLOVA Studio) 플레이그라운드 테스트 앱 생성
- https://clovastudio.ncloud.com/ 접속 -> 플레이그라운드 챗 모드
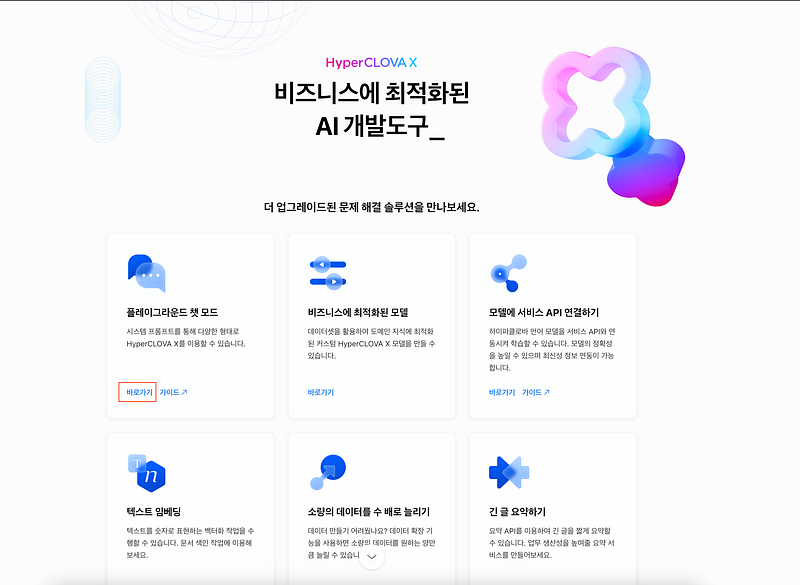
- 저장 및 테스트 앱 생성 하기 (별도의 프롬프트 및 튜닝 X)


2. 테스트 앱 소스코드 예제 및 키 값 확인
- 테스트 앱 생성 시 API 호출을 위한 KEY 값들을 확인 할 수 있습니다.

API 예제
1
2
3
4
5
6
7
8
9
10
11
12
13
14
15
16
17
18
19
20
21
22
23
24
25
26
27
28
29
30
31
32
33
34
35
36
37
38
39
40
41
42
43
44
45
46
47
48
49
50
51
52
   # -*- coding: utf-8 -*-

import requests


class CompletionExecutor:
    def __init__(self, host, api_key, api_key_primary_val, request_id):
        self._host = host
        self._api_key = api_key
        self._api_key_primary_val = api_key_primary_val
        self._request_id = request_id

    def execute(self, completion_request):
        headers = {
            'X-NCP-CLOVASTUDIO-API-KEY': self._api_key,
            'X-NCP-APIGW-API-KEY': self._api_key_primary_val,
            'X-NCP-CLOVASTUDIO-REQUEST-ID': self._request_id,
            'Content-Type': 'application/json; charset=utf-8',
            'Accept': 'text/event-stream'
        }

        with requests.post(self._host + '/testapp/v1/chat-completions/HCX-003',
                            headers=headers, json=completion_request, stream=True) as r:
            for line in r.iter_lines():
                if line:
                    print(line.decode("utf-8"))


if __name__ == '__main__':
    completion_executor = CompletionExecutor(
        host='https://clovastudio.stream.ntruss.com',
        api_key='값 입력',
        api_key_primary_val='값 입럭',
        request_id='값 입력'
    )

    preset_text = [{"role":"system","content":""},{"role":"user","content":""}]

    request_data = {
        'messages': preset_text,
        'topP': 0.8,
        'topK': 0,
        'maxTokens': 256,
        'temperature': 0.5,
        'repeatPenalty': 5.0,
        'stopBefore': [],
        'includeAiFilters': True,
        'seed': 0
    }

    print(preset_text)
    completion_executor.execute(request_data)>
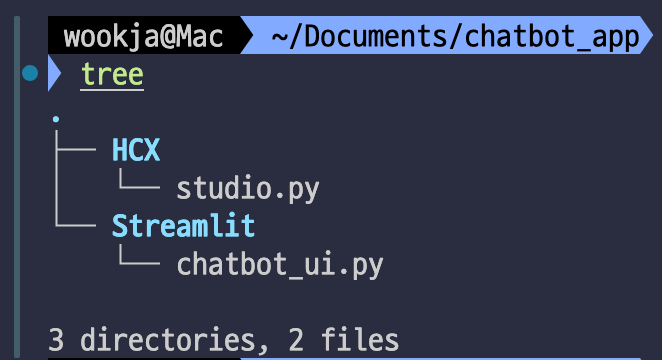
3. 프로젝트 디렉토리 생성 & 코드 작성
1
2
3
4
5
6
7
8
9
wookja@Mac ~/Documents/chatbot_app
tree
.
├── HCX
│ └── studio.py
└── Streamlit
└── chatbot_ui.py
3 directories, 2 files
HCX/studio.py
1
2
3
4
5
6
7
8
9
10
11
12
13
14
15
16
17
18
19
20
21
22
23
24
25
26
27
28
29
30
31
32
33
34
35
36
37
38
39
40
41
42
43
44
45
46
47
48
49
50
51
52
53
54
55
56
57
58
59
60
61
from flask import Flask, request, jsonify, render_template
import hashlib
import hmac
import base64
import time
import requests
import json

app = Flask(__name__)

class CompletionExecutor:
    def __init__(self, user_question):
        self.user_question = user_question
        self.studio_host = 'https://clovastudio.stream.ntruss.com'
        self.studio_api_key = '값 입력'
        self.studio_api_key_primary_val = '값 입력'
        self.studio_request_id = '값 입력'

    def send_question_to_studio_api(self):
        headers = {
            'X-NCP-CLOVASTUDIO-API-KEY': self.studio_api_key,
            'X-NCP-APIGW-API-KEY': self.studio_api_key_primary_val,
            'X-NCP-CLOVASTUDIO-REQUEST-ID': self.studio_request_id,
            'Content-Type': 'application/json; charset=utf-8'
        }

        request_data = {
            'messages': [{"role": "system", "content": ""}, {"role": "user", "content": self.user_question}],
            'topP': 0.8,
            'topK': 0,
            'maxTokens': 1024,
            'temperature': 0.5,
            'repeatPenalty': 5.0,
            'stopBefore': [],
            'includeAiFilters': True,
            'seed': 0
        }

        response = requests.post(self.studio_host + '/testapp/v1/chat-completions/HCX-003', headers=headers, json=request_data)
        if response.status_code == 200:
            return response.json()
        else:
            return {'error': f"Studio API Error: {response.status_code}, Message: {response.text}"}

# @app.route('/')
# def index():
#    return render_template('index.html')

@app.route('/send', methods=['POST'])
def send_question():
    data = request.json
    user_question = data.get('user_question')
    if not user_question:
        return jsonify({'error': '질문이 제공되지 않았습니다'}), 400

    integration = CompletionExecutor(user_question)
    response = integration.send_question_to_studio_api()
    return jsonify(response)

if __name__ == '__main__':
    app.run(host='0.0.0.0', port=4000)
이 Flask 애플리케이션 코드는 사용자가 제공한 질문을 CLOVA API로 보내고 그 응답을 반환하는 기능을 수행합니다. 각 부분의 기능을 설명하면 다음과 같습니다:
주요 클래스 및 함수 설명:
- CompletionExecutor 클래스 :
init 메서드 : 이 클래스의 생성자로, 사용자 질문과 클로바 스튜디오 API를 호출하는데 필요한 주요 정보를 초기화합니다.
self.user_question: 사용자가 입력한 질문을 저장합니다.self.studio_host: 클로바 스튜디오 API의 호스트 URL입니다.self.studio_api_key,self.studio_api_key_primary_val,self.studio_request_id: 클로바 스튜디오 API에 접근하기 위한 키와 요청 ID입니다.
send_question_to_studio_api 메서드 : 사용자 질문을 클로바 스튜디오 API로 보내고 응답을 받는 메서드입니다.
headers: API 요청에 필요한 헤더 정보를 설정합니다.request_data: API에 전송할 데이터의 형식을 JSON으로 설정합니다.response: API에 POST 요청을 보내고 응답을 받습니다. 상태 코드가 200일 경우 JSON 형식으로 응답을 반환하고, 그렇지 않을 경우 오류 메시지를 반환합니다.
2. Flask 라우트 및 핸들러 :
/send 엔드포인트 : 사용자의 질문을 받아 CompletionExecutor 클래스를 사용해 클로바 스튜디오 API로 전송하고 응답을 반환합니다.
data: 클라이언트로부터 받은 JSON 데이터를 파싱합니다.user_question: 받은 데이터에서user_question값을 추출합니다. 값이 없을 경우 400 상태 코드와 함께 오류 메시지를 반환합니다.integration: CompletionExecutor 클래스의 인스턴스를 생성하고,send_question_to_studio_api메서드를 호출합니다.response: API 응답을 JSON 형식으로 반환합니다.
3. 메인 실행부 :
- Flask 애플리케이션을 실행합니다. 호스트를
0.0.0.0, 포트를4000으로 설정하여 외부에서 접근 가능하게 만듭니다.
Streamlit/chatbot_ui.py
1
2
3
4
5
6
7
8
9
10
11
12
13
14
15
16
17
18
19
20
21
22
23
24
25
26
27
28
29
30
31
32
33
34
35
36
37
38
39
40
41
42
43
44
45
46
47
48
49
50
51
52
53
54
55
56
57
58
59
60
61
62
import streamlit as st
import requests
import datetime

# Initialize session state variables
if 'conversation' not in st.session_state:
    st.session_state['conversation'] = []

st.set_page_config(page_title="Brickmate Chatbot Service", page_icon="🤖")

# Improved CSS styling
# 생략

def send_question():
    user_question = st.session_state['user_input']
    if user_question:
        response = requests.post(
            'http://localhost:4000/send',
            json={'user_question': user_question}
        )
        if response.status_code == 200:
            response_data = response.json()
            bot_response = extract_bot_response(response_data)
            st.session_state['conversation'].append({"user": user_question, "bot": bot_response, "timestamp": datetime.datetime.now().strftime("%Y-%m-%d %H:%M:%S")})
        else:
            st.session_state['conversation'].append({"user": user_question, "bot": "Error: Unable to get response from server.", "timestamp": datetime.datetime.now().strftime("%Y-%m-%d %H:%M:%S")})
        st.session_state['user_input'] = ""  # Clear input field after sending

def extract_bot_response(response):
    try:
        if 'bubbles' in response and 'data' in response['bubbles'][0]:
            return response['bubbles'][0]['data'].get('description', "Sorry, I couldn't understand the response.")
        if 'result' in response and 'message' in response['result']:
            return response['result']['message'].get('content', "Sorry, I couldn't understand the response.")
        return "Sorry, I couldn't understand the response."
    except (IndexError, KeyError, TypeError) as e:
        return f"Error: {e}"

st.markdown("<div class='chat-container'>", unsafe_allow_html=True)

# Display the conversation history
for chat in st.session_state['conversation']:
    st.markdown(f'''
    <div class="chat-row user">
        <div class="chat-bubble chat-bubble-user">{chat["user"]}</div>
        <img class="user-icon" src="https://www.gravatar.com/avatar?d=mp&s=40" alt="user icon">
    </div>
    <div class="timestamp" style="text-align: right;">{chat["timestamp"]}</div>
    <div class="chat-row bot">
        <img class="bot-icon" src="https://kr.object.ncloudstorage.com/bm-arnold/brickmate.gif" alt="bot icon">
        <div class="chat-bubble chat-bubble-bot">{chat["bot"]}</div>
    </div>
    <div class="timestamp">{chat["timestamp"]}</div>
    ''', unsafe_allow_html=True)

st.markdown("</div>", unsafe_allow_html=True)

# Input field for user question and send button
st.markdown("<div class='chat-input-container'>", unsafe_allow_html=True)
user_input = st.text_input("Your question:", key="user_input", placeholder="질문을 입력하세요.", label_visibility='collapsed')
send_button = st.button("Send", on_click=send_question, disabled=not user_input.strip())
st.markdown("</div>", unsafe_allow_html=True)
이 Streamlit 애플리케이션은 사용자가 입력한 질문을 Flask 서버에 보내고, 서버로부터 받은 응답을 사용자에게 보여주는 채팅 인터페이스를 구현합니다. 이 코드의 주요 부분과 기능을 설명하면 다음과 같습니다:
주요 기능 설명:
채팅 인터페이스 :
- 채팅 컨테이너 :
chat-container클래스를 사용해 채팅 인터페이스의 전체 레이아웃을 설정합니다. 사용자와 봇의 채팅 버블을 각각chat-bubble-user와chat-bubble-bot클래스로 스타일링합니다. - 입력 필드와 버튼 :
chat-input-container클래스를 사용해 사용자 입력 필드와 전송 버튼의 레이아웃을 설정합니다. 사용자 입력 필드는st.text_input으로 구현되고, 전송 버튼은st.button으로 구현됩니다.
질문 전송 및 응답 처리 :
- send_question 함수 : 사용자가 입력한 질문을
localhost:4000/send엔드포인트로 POST 요청을 보내는 함수입니다. 응답을 받아conversation세션 상태에 추가합니다. - user_question : 사용자 입력을 가져옵니다.
- requests.post : Flask 서버에 POST 요청을 보냅니다.
- response : 서버로부터 응답을 받고, 이를
conversation리스트에 추가합니다. - extract_bot_response : 서버 응답에서 봇의 메시지를 추출하는 함수입니다. 응답 형식에 따라 메시지를 파싱합니다.
채팅 기록 표시 :
st.markdown을 사용해 채팅 기록을 HTML 형식으로 렌더링합니다. 사용자가 입력한 질문과 봇의 응답을 각각 다른 스타일로 표시합니다.chat-row클래스를 사용해 채팅 기록을 사용자와 봇으로 구분하여 레이아웃을 설정합니다.- 입력 필드 및 전송 버튼 :
- 입력 필드 :
st.text_input을 사용해 사용자 입력 필드를 구현합니다. 키가 “user_input”으로 설정됩니다. - 전송 버튼 :
st.button을 사용해 질문을 전송하는 버튼을 구현합니다. 사용자가 입력 필드에 내용을 입력하면 버튼이 활성화됩니다.
💡참고
CLOVA Studio 내 프롬프트 및 튜닝을 진행 하지 않았기 때문에 원하시는 답변이 안 나올수가 있습니다.
페이지가 (css styling 부분) 조금 깨져 보일 수가 있으니, UI를 다듬으실 분들은 수정하여 이용 하시길 바랍니다.
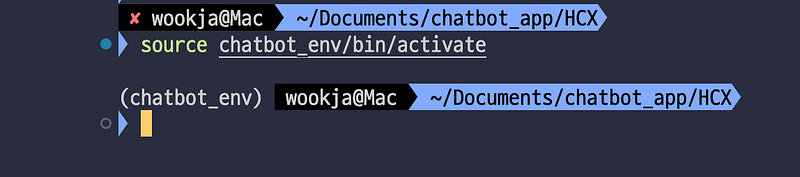
4. 가상 환경 활성화 (venv) & 코드 실행
터미널 실행 - > HCX 폴더 이동 -> 가상환경 활성화
1
2
3
4
5
$ cd HCX

$ python3 -m venv chatbot_env

$ source chatbot_env/bin/activate
- 가상환경 활성화 확인
모듈 설치
- request & flask 설치
1
2
3
4
5
$ pip install requests && pip install flask
(chatbot_env) wookja@Mac ~/Documents/chatbot_app/HCX
pip install requests && pip install flask
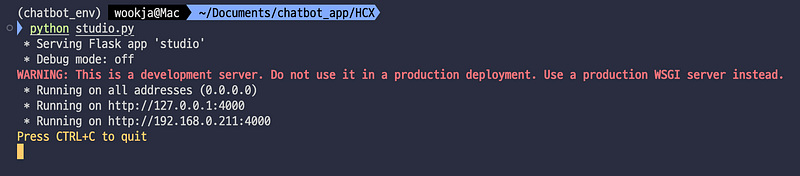
코드 실행
1
2
3
4
5
6
7
8
9
10
11
12
$ python studio.py
(chatbot_env) wookja@Mac ~/Documents/chatbot_app/HCX
python studio.py
* Serving Flask app 'studio'
* Debug mode: off
WARNING: This is a development server. Do not use it in a production deployment. Use a production WSGI server instead.
* Running on all addresses (0.0.0.0)
* Running on http://127.0.0.1:4000
* Running on http://192.168.0.211:4000
Press CTRL+C to quit
`
새로운 터미널 실행 - > Streamlit 폴더 이동 -> 가상환경 활성화
1
2
3
4
5
$ cd Streamlit

$ python3 -m venv chatbot_env

$ source chatbot_env/bin/activate
- 가상환경 활성화 확인

모듈 설치
- streamlit 설치
1
2
3
4
5
6
7
8
9
10
$ pip install streamlit
(chatbot_env) wookja@Mac ~/Documents/chatbot_app/Streamlit
pip install streamlit
.
.
.
[notice] A new release of pip is available: 24.0 -> 24.2
[notice] To update, run: pip install --upgrade pip
코드 실행
1
2
3
4
5
6
7
8
9
10
11
12
13
14
$ streamlit run chatbot_ui.py
(chatbot_env) wookja@Mac ~/Documents/chatbot_app/Streamlit
streamlit run chatbot_ui.py
You can now view your Streamlit app in your browser.
Local URL: http://localhost:8502
Network URL: http://192.168.0.211:8502
For better performance, install the Watchdog module:
$ xcode-select --install
$ pip install watchdog

5. 서비스 동작 확인
http://localhost:8502/ 접속 후 챗봇 UI 확인

질문 해보기


- 질문을 입력하고 Send 버튼을 누르면 답변이 오는 것을 확인 할 수 있습니다.
 POST 응답 확인
마치며
CLOVA Chabot 서비스를 이용하지 않고 일반 LLM 모델을 사용해서 챗봇 서비스를 구현 해 보았는데요,
개인적으로 프롬프트를 따로 건들지 않아서 조금 아쉬운 부분도 있는 것 같습니다.
Chatbot 서비스를 이용하고 싶으신 분들은 Chatbot Custom API + Streamlit 을 이용하여 챗봇 서비스를 구현하는 방법도 있으니 아래 가이드를 참고 부탁드립니다.
🧩 최종 코드
🔗 👉 GitHub - NCP_Chatbot 최종 코드 보기
감사합니다 🙌
참고 URL
CLOVA Chatbot Custom API
Custom 채널에서 CLOVA Chatbot 으로 요청(Request)을 보낼 시 방법을 설명합니다. api.ncloud-docs.com
감사합니다 !